
This guide will teach you how to navigate the Scan Report page in Autobahn
Table of content
The Scan Report view includes the details of the scan launched via the Autobahn platform or a result of the file upload. To access the full report the scan needs to be completed - it will be marked as Finished in the status column of the All scans table in the Scanning page. To open the Scan Report simply click on a scan name.
Please note that the All Scans view also includes data from integrated sources. When you click on links to results from Cisco, CyCognito, Microsoft Defender for Endpoint, Microsoft Defender for Cloud, Nessus, or Tenable, you will be redirected to the Issues view—not the Scan Report page.
This is because these data fetches are not actual scans (the assets are not accessed by Autobahn's scanning engines); instead, the data is processed by the Autobahn platform for re-prioritization and consolidation with other findings to be finally presented under Workouts.
1. Scan Report page
As mentioned above, the Scan Report page is only available for the vulnerability scans initiated through the Autobahn platform or manual file uploads that have been Finished.
This view is divided into several sections:
Issues overview
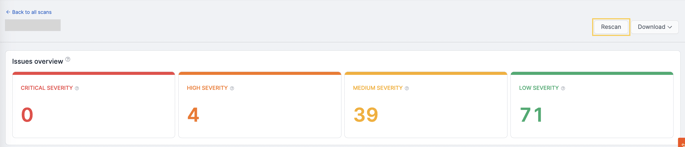
The total number of issues detected in the scan is categorized by severity ratings. Learn more about issues in this article.
General details
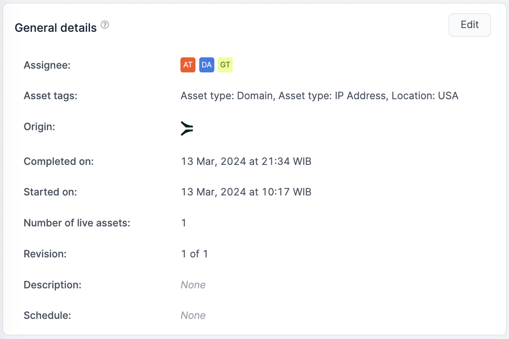
- Assignee: the person assigned to the scan. You can change the assignee by clicking the Edit button.
Please note that the assignee of a scan automatically becomes the assignee of the assets within the scan. Also, they will be assigned to all the issues detected on these assets and also to all the Workouts relevant to these issues so that they can remediate them.
- Asset tags: tag/label implemented to assets within this scan. You can edit tags in this view as well.
- Origin: the engine that was used to run the scan.
- Completed on: the timestamp indicating when the scan finalized.
- Started on: the timestamp indicating when the scan started.
- Number of live Assets: the number of assets scanned for vulnerabilities.
- Revision: indicates the number of times the targets have been re-scanned.
- Description: description (if any) that was added during scan creation.
- Schedule: indicates the next planned revision of the scan.
Severity distribution
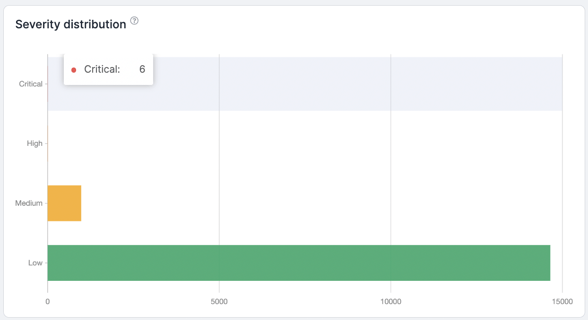
A graphic representation of the number of issues detected by the scan. It can be used to communicate the current security posture of e.g. a company's department or operational unit to stakeholders.
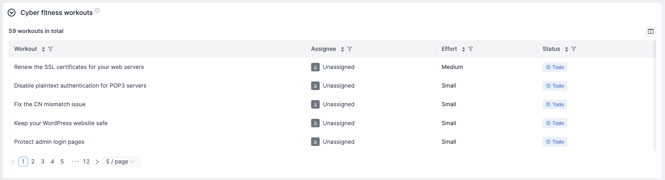
Cyber Fitness Workouts
List of Workouts (remediation guides) crafted for the vulnerabilities found in your scan. Click on the Workout(s) to view the remediation steps.
Individual issues
List of identified issues discovered during the scan.
Assets
List of reachable assets that have been scanned.
Non-alive hosts
Detected hosts that were inserted as targets, but were not reachable during the time of the scan.
Targets
Targets added during the scan creation.
Ports
Ports you selected/added during the scan creation.
2. Download scan report
Autobahn gives you the option to download a Scan Report. Use the dropdown in the top right corner to generate a spreadsheet with all the scan details including issues overview and details as well as the list of workouts:
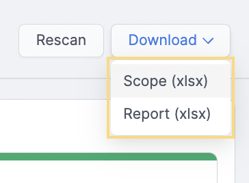
You can also download the Scan Scope - the list of targets with tags and criticality (if specified). Both files can also be downloaded from the Scanning page (the last column in the All scans table - Action / Download)
Please allow the platform some time to generate the reports.
3. Running scan
If you click on a name of the scan that is still running, you will not see any results of the scan, but selected information about the scan itself:
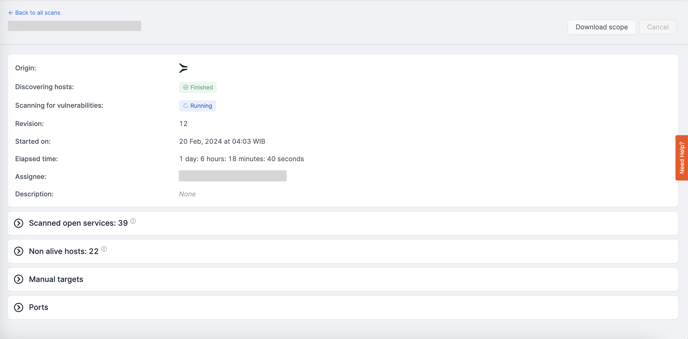
- Origin: The engine that is used to run the scan (Autobahn's own scanner or powered by the Qualys engine).
- Discovering host: Before scanning for vulnerabilities, the scanner may first attempt to identify subdomains, active hosts, and services.
- Scanning for vulnerabilities: Learn more about statuses in this guide. Once live hosts and services are discovered, the scanner probes deeper to gather details about the target environment. After identifying active services and software versions, the scanner checks for known vulnerabilities based on security databases.
- Revision: Indicates the number of times the scan's targets have been re-scanned.
- Elapsed time: The duration for which the scan has been running. The scan time depends on the number of targets and can range from hours to days, especially for subnet ranges with thousands of IPs or domains.
- Assignee: The person assigned to the scan, usually selected during scan creation. You can also change the assignee of an existing scan on the Scanning page in the All scans table.
- Description: The optional description added during scan creation.
- Scanned open services: The ports that were reachable and scanned by our engine.
- Non alive hosts: Hosts that were added as targets, but were not reachable at the time of the scan.
- Targets: The list of assets specified during scan creation.
- Ports: The ports selected/added during the scan creation.
4. Frequently asked questions
1. Can I delete a scan?
If you wish to remove a scan, please contact us at support@autobahn-security.com. Autobahn's UI makes it possible to hide a scan's revision so that it doesn't appear in the All scans table: go to Action dropdown and select the Hide revision option. If you wish to see the hidden scans again, use the eye icon above the All scans list.