
Find the instructions on how to integrate Microsoft (MS) Defender for Endpoint with Autobahn Security in this article
Linking your MS Defender for Endpoint account lets you import scan results from your Microsoft environment(s) so they can be prioritized and clustered into Cyber Fitness Workouts.
Table of content
- Prerequisites to enable the integration
- Integrate MS Defender for Endpoint with Autobahn Security
- Enable or disable the integration
- Update the integration's configuration
- View and interpret MS Defender for Endpoint results
1. Prerequisites to enable the integration
Integrating MS Defender for Endpoint data into Autobahn Security requires several key elements:
- Directory (tenant) ID
- Application (client) ID (App ID)
-
Client secret
To collect this data, you must first create an app in Microsoft Azure dashboard for MS Defender and set the right permissions for this app.
a. Create an app in Microsoft Azure dashboard for MS Defender
1 - In Microsoft Azure dashboard, go to the search bar and type App registrations. Click on the result.

2 - Inside App registrations, click the New registration button.

2 - On the registration page:
- Enter a name for your app, for example Autobahn Security
- Select Single Tenant as the Supported Account Types
- Select Web under Redirect URL (you can leave the Redirect URI section empty)
- Then click the Register button.

b. Grant permission to your newly created app
1 - In the newly created app registration, navigate to the API permissions tab and click the Add a permission button.

2 - The dialog box for requesting API permissions will appear. Go to the APIs my organization uses tab, search for "WindowsDefenderATP" and click on the result.

3 - In the next screen select Application permissions and select the following permissions:
- Alert.Read.All
- AdvancedQuery.Read.All
-
Machine.Read.All
-
SecurityRecommendation.Read.All
-
Vulnerability.Read.All
These permissions need to be selected to gather the correct data.

4 - As a final step click the Grant admin consent button to grant access to the required permissions.

c. Create Client Secret
1 - Navigate to the Certificates & Secrets page, open the Client Secrets tab and click the New client secret.
2 - On the Add client secret box, enter a description (for example autobahn_secret) and decide for how long the secret should be valid. Copy the value of the newly created secret (please make sure to copy the Value item).
In the future, once the secret ID expires, you must create a new one and update the integration in Autobahn Security.

d. Collect Application (client) and Directory (tenant) ID
1 - As a last step, take note of the following information, which you will need to enable the integration in Autobahn:
-
Application (client) ID
-
Directory (tenant) ID

2. Integrate MS Defender for Endpoint with Autobahn Security
After all the prerequisites have been gathered, go to Autobahn Security app and navigate to the Integrations page.
1 - Find the MS Defender for Endpoint tile on the Integrations page and click the Configure button.

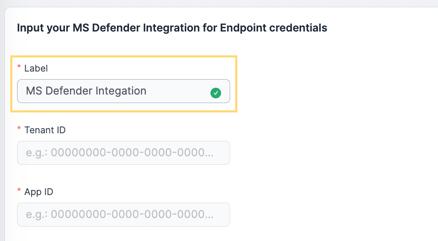
2 - On the MS Defender Integration for Endpoint page, input the integration label on the Label field - it will be shown after the prefix "MS Defender for Endpoint".
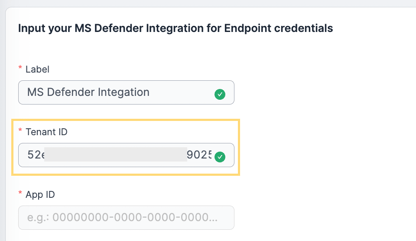
3 - Input your MS Defender Directory (tenant) ID in the Tenant ID field.
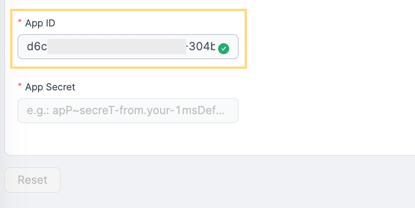
4 - Input your MS Defender Application (client) ID in the App ID field.
5 - Input the value of your MS Defender App secret (Client secret) in the App Secret field.
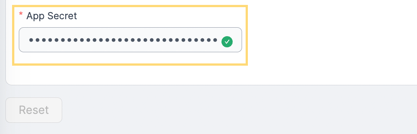
6 - Once you have completed the form, click the Save button.
7 - If the credentials are correct, a confirmation popup message will be displayed.
If you have encountered an error, please let us know by reaching out to:
support@autobahn-security.com
Once activated, Autobahn Security will directly fetch the latest machine and vulnerability data from MS Defender and will continue to fetch this data once a week, unless deactivated.
3. Enable or disable integration
You can enable or disable the integration by:
1 - Navigate to the Integrations page.
2 - Switch off the toggle on the top right of the MS Defender for Endpoint card.
4. Update MS Defender for Endpoint integration configuration
1 - Navigate to the Integrations page.
2 - Click the Edit button on the bottom of the MS Defender for Endpoint card. You will be directed to the MS Defender for Endpoint integration page.
3 - Click the Reset button to remove the previously added credentials and add new credentials.
Before resetting the configuration, ensure to configure MS Defender for Endpoint first.
5. View and interpret MS Defender for Endpoint results
Once the integration has been enabled, the MS Defender for Endpoint data will be fetched weekly into the Autobahn Security and, after re-evaluation and re-prioritization, displayed in the app clustered under relevant Workouts.
It is expected that the majority of issues will have their severity reduced as part of the re-prioritization process by Autobahn. Microsoft Defender for Endpoint is a highly expressive tool, and many issues initially flagged as critical or high severity are, in fact, not exploitable to that extent.
Autobahn Security will still display all identified issues—there is no data loss—but their severity levels will typically be lower than the original values provided by the data source.
The details of the findings can be accessed from the Scanning page - after each of the data fetches a new Revision will be created there and clicking on the revision number will redirect you to the Issues page filtered by the Microsoft Defender for Endpoint origin.
You can also check your MS Defender for Endpoint assets by navigating to the Assets page and filtering it in the Source column.