This user manual will instruct you on how to integrate Cisco Secure Workload with Autobahn
Table of content
- Why integrate Cisco Secure Workload with Autobahn
- Prerequisites to enable the integration
- Integrate Cisco Secure Workload with Autobahn
- View pulled data in Autobahn
- Enable/Disable your instance
- Remove instance
1. Why integrate Cisco Secure Workload with Autobahn
Cisco Secure Workload (formerly Cisco Tetration) is a security tool that helps keep your applications and data safe. It works across data centers and cloud environments, wherever your programs are running. Imagine your workloads as the engines that power your organization - Cisco Secure Workload helps ensure they’re protected from threats.
By integrating your Cisco Secure Workload account with Autobahn, you can automatically send information about your applications and vulnerabilities to the Scanning and Issues pages. This data will then be reorganized and mapped into Cyber Fitness Workouts.
2. Prerequisites to enable the integration
To enable the integration, several pieces of information need to be prepared:
-
API Endpoint
-
API Key
-
API Secret
2.a. Determine the Cisco Secure Workload API Endpoint
One of the pieces of information needed to integrate your Cisco Secure Workload account is the API Endpoint. API Endpoint is the registered path or URL that redirects to the API server of your Cisco Secure Workload installation.
2.b. Generate Cisco Secure Workload API Key and Secret
Cisco Secure Workload API Key and Secret act like a digital handshake, allowing programmatic interaction with Cisco Secure Workload. For more details and references on API authentication in Cisco Secure Workload, you can refer to the official User Guide.
To generate them, follow the steps below.
1 - Log in to the Cisco Secure Workload UI Dashboard.
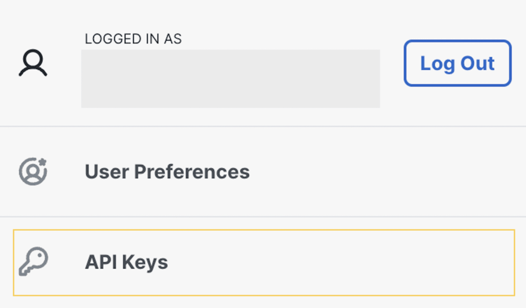
2 - Click on your logged-in account in the upper right corner.
3 - From the dropdown menu, choose API Keys.

4 - This will bring you to the API Keys management page. Here, you can create new API credentials.
5 - Define the desired capabilities for your API key and secret. 
Please select as shown in the screenshot below:
-
Flow, workload, and inventory APIs: API related to workloads, flows and inventory items in Tetration cluster
-
SW sensor management: API to configure and monitor status of SW sensors
6 - Once configured, click the Generate button to create the API key and secret.
7 - Copy and save the generated API key and secret. You need to use them later on the Autobahn's Integrations page.
3. Integrate Cisco Secure Workload with Autobahn
After preparing the Cisco Secure Workload credentials, log into your Autobahn account and navigate to the Integrations page. On this page:
1 - Click the Configure button on the Cisco Secure Workload tile.

2 - In the Cisco Secure Workload integration page, click the + Add instance button.

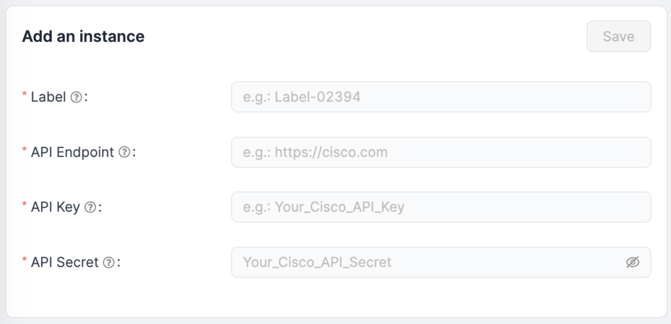
3 - Add your credentials in the form that appears.

Label: Label your integration instance to your liking. The purpose of this label is to differentiate the instances.
API Endpoint: Insert the path or URL that redirects to the API server of your Cisco installation.
API Key: The access key you previously generated.
API Secret: The secret key you previously generated.
4 - Once filled, click the Save button to save the instance.
4. View pulled data in Autobahn
After you integrate Cisco Secure Workload with Autobahn, it will take approximately 1 hour for the data to be imported and displayed in Autobahn. You can view your vulnerabilities and asset data taken from Cisco on the Individual Issues and Assets pages.

On both pages, you can view Cisco data by filtering the table by selecting Cisco Secure Workload in the Source column.
5. Enable/disable your instance
If you wish to temporarily stop Autobahn from collecting data from a particular instance that you added, you can disable that instance. However, the previously fetched data and instances data will still be present in Autobahn.
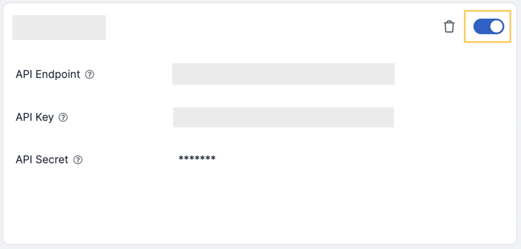
To disable the active integration for a particular instance, simply click the toggle button present in the instance card.

You can re-enable the integration by switching the toggle back. When re-enabled, the system will fetch the data from the last fetching date.
6. Remove instance
You can also remove a previously added instance. Removing the instance will prevent our engine from fetching new data from the removed instance. The previously fetched data will remain in Autobahn.

