
Ingest data from Nessus on-premise installations into Autobahn Security using internal satellites
By integrating Nessus on-premise with Autobahn Security, you can view all your scan information in one platform. This includes full-fledged remediation guides for issues identified by Nessus. Imported scans will be conveniently displayed on the Scan page for easy access and management.
To set up this integration, you must install an internal satellite that will regularly pull data from your on-premise Nessus installation(s).
1. Nessus setup
1.1. Get Nessus API server URL
1.2. Create Nessus username and password
2. Autobahn Security setup
2.1. Install Autobahn worker
2.2. Install Docker Image
2.3. Install the integration satellite
2.4. Allow outbound connections
3. View your pulled scans on Scans page
4. Enable/Disable active instances
1.1. Get Nessus API server URL
Caution: Generating a new API key replaces any existing keys and de-authorizes any linked applications
1 - Login into your Nessus account.
2 - Navigate to the Settings page. You will be directed to the About tab.

3 - Open the My Account tab.
4 - On the My Account tab, click the Generate button. 
A dialog box appears, confirming your selection to generate a new API key. Click the Generate button to confirm. A URL will be generated, copy the one with `api`.
Example value: http://102.185.1.5:8814
Tip: To access the Tenable Nessus API documentation, navigate to:
<Tenable Nessushost>:<port>/api#/overview.
1.2. Create a Nessus username and password
If you already have an existing Nessus user, you can use the credentials to integrate your Nessus account. Otherwise, follow these steps to create a new username and password:
Note: You can only perform this procedure in Tenable Nessus Manager. You cannot have multiple user accounts in Tenable Nessus Professional or Tenable Nessus Expert.
1 - Log into your Nessus account.
2 - In the top navigation bar, click Settings.

3 - The About page appears, in the left navigation bar, click the My Account button.

4 - In the upper right corner of Users page, click the New User button.
5 - Fill the necessary fields.

6 - Select a role for the user. The minimum requirements for this account are Read/Run reports.
Note: You cannot modify a username after the account is created.
7 - Save the username and password that you use.
8 - Click Save to save the new user. Your account will appear on the account list.
2. Integrate Nessus with Autobahn Security
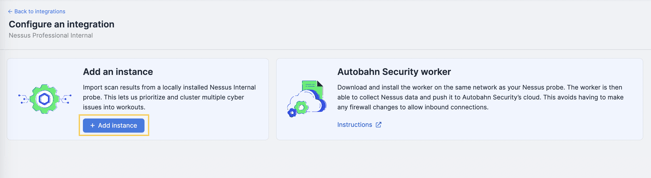
1- After you collect the required credentials, log into your Autobahn Security account and navigate to the Integrations page.

2 - Click Configure on the Tenable - Nessus Internal Satellites card.

If you already have Nessus configured, this means that someone in your organization has already configured the Nessus account, and this applies organization-wide.
4 - You will be directed to Configure an integration page. Click the Add instance button.
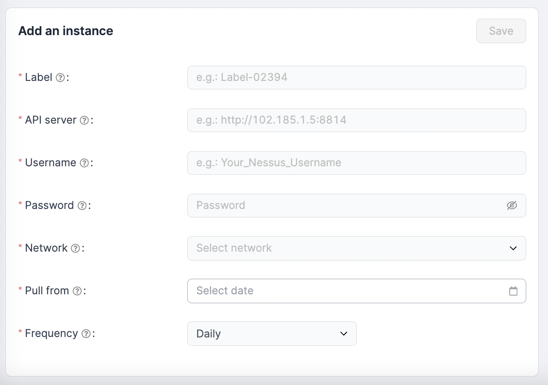
- Label: Label to differentiate the different instances.
- API server: The path or URL that redirects to the API server of your Nessus installation.
- Username: The minimum permission of the user you are using for the Autobahn integration is Read/Run Reports.
- Password: Password for the user.
- Network: Currently, only an internal network is available.
- Pull from: The date of the scans to be pulled from. For example: if you select 10 January 2023, all scans that were created from 10 January 2023 onwards will be imported.
- Frequency: The pulling frequency and how often the Autobahn Security engine pulls the data.
Tip: you can add multiple instances.
You need to download the Autobahn Security worker after adding your instance(s). The worker can then collect Nessus data and push it to Autobahn Security's cloud. This avoids having to make any firewall changes to allow inbound connections.
For optimal performance, we suggest running the worker on a Linux system. While Windows is technically possible, it's not officially supported and may lead to unexpected issues.
1 - Click the download icon in the instance card on the Integration page.

2 - Install the downloaded Autobahn Security worker in the same network as your Nessus probe.
Tip: If you added multiple instances on the Integrations page, you need to download the worker from all the added instances and repeat the steps.
2.2. Install Docker Image
Autobahn Security is deployed via a Docker image. Please note that the server hosting the docker should have at least 4 CPU cores, 8 GB RAM, 100GB HDD, and internet access.
Docker installation steps may differ depending on the installed operating system. Please refer to the Docker official site for installation tutorials based on the operating system (Reference: Install Docker Engine).
After installing, please follow the post-install step as described in Linux post-installation steps for Docker Engine. As a quick summary, you should grant the current user permission to run Docker commands.
You can install a pre-configured image through the Autobahn Security Docker registry with these steps:
1 - You need to have Docker installed on your system. On Ubuntu, this command installs docker:
$ sudo apt install docker.io
More information: Docker: Accelerated, Containerized Application Development
Ensure your user account has the required permissions to run this command.
2 - Next, ensure that your user account can start Docker containers by running these commands:
$ sudo groupadd docker
$ sudo usermod -aG docker ${USER}
3 - At this point, you need to log out and log in again for the group change to be effective.
$ docker ps
2.3. Install the integration satellite
1 - Execute the following command to extract the configuration and installation files, and to install the Integration Satellite Docker image.
$ unzip instance_name.zip
Replace instance_name with the name of the zip file that you have.
$ cd integration_satellite
2 - Then run the satellite using the following command to start pulling the data.
$ ./autobahn_probe.sh run
The prompt will notify you that the satellite is running.
Other important commands worth noting:
-
Upgrade to the latest Integration Satellite:
$ ./autobahn_probe.sh run
- Stop running satellite:
$ ./autobahn_probe.sh stop
-
Uninstall the Integration Satellite from Docker:
$ ./autobahn_probe.sh uninstall
-
For more information on each script, run them with:
./autobahn_probe.sh help
2.4. Allow outbound connections
The Docker host needs to be able to reach these IP addresses to provide direct (secured) connections to the Autobahn Security platform:
- http://hub.docker.com:443
- auth.docker.io:443
- registry-1.docker.io:443
- http://index.docker.io/:443
- dseasb33srnrn.cloudfront.net:443
- http://production.cloudflare.docker.com/:443
- mq.app.autobahn-security.com:443
Navigate to the Scanning page to check your scans. The pulled scans on the page have the Tenable - Nessus Internal Satellites logo in the Origin column.

4. Enable/disable active instances
After adding multiple instances to the Autobahn Security platform, you may want to disable instances that are no longer relevant to your organization. You can do that by clicking the toggle in the instance card.

Disabling an instance will prevent Autobahn Security from fetching new scans from that instance. However, previously fetched scans will not be removed.
You can enable the data fetching by clicking the toggle on the disabled instance. Once re-enabled, the Autobahn Security engine will fetch the scan data from the last pull date.