
Uncover your weaknesses: how to create internal and external scans in Autobahn
Autobahn empowers you to proactively safeguard your infrastructure from potential threats. This article explains how to create scans with Autobahn. Scans can be conducted from two perspectives: external, mimicking real-world external hacking attempts, and internal, focusing on vulnerabilities within your network perimeter.
Table of contents
- Select the scanner
- Additional settings
- Schedule scans
- Advanced settings
- Asset configuration
- Review and start or schedule your scan
Before diving into scan creation, it's crucial to ensure proper network configuration. Whitelisting creates an exception for our scanner IPs, allowing them to scan your network without being blocked and ensuring visibility over all your assets. You can find a comprehensive list of these IPs here.
Once whitelisting is complete, proceed with creating your scan using the steps outlined below.
1. Select the scanner
On the Scanning page, click the Create scan button to begin configuring your scan. The first step is selecting the scanner.
Autobahn offers the following scanning options:
- External with Autobahn or Qualys engine - allows you to run scans on internet-facing assets.
- Internal via Autobahn or Qualys probe - allows you to run scans on internal assets. More information on the probes can be found in this article.
The default options available to you depend on the license tier you purchased when subscribing to Autobahn. If you’d like to run scan types that aren’t included in your current plan, please contact your Customer Success Manager or reach out to support@autobahn-security.com

When configuring an internal scan, you’ll be prompted to specify the service environment - either Private or Kubernetes (in most cases, this will be Private) as well as the probe provided by your Customer Success Manager.
There may be multiple probes available, so it’s important to select the one that aligns with your specific context, such as your company unit’s location, department, or network segment (it will be indicated in the probe's name). This selection should be then reflected in the scan name and asset targeting so that the right probe can reach the right assets.
2. Additional settings
To proceed to the next step, asset configuration, simply enter a unique scan name. However, it is strongly recommended to assign a scan to your team member. This assignment will automatically carry over to all related assets, issues, and ultimately the workouts, helping ensure clear asset ownership and a structured remediation process.
It’s also good practice to add tags, as they are helpful in managing assets, filtering views, and building custom dashboards. Tags can represent company units, branches, locations, technology types, network segments, and more, making your data easier to organize and analyze.

3. Schedule scans
Autobahn enables you to schedule scans to run automatically at predefined intervals.
This eliminates the need to manually initiate scans and ensures continuous monitoring of your security posture. The system regularly feeds fresh data into the platform, delivering actionable insights through remediation Workouts.
By default, the scan schedule is set to No Schedule (start immediately). Using the dropdown menu, you can choose from additional options, including a scheduled One-time scan (will not repeat but won't start immediately) and recurring scans with a weekly or monthly cadence.
You can optionally set an end date, depending on your preferences. For example, you might schedule a scan to run monthly on a specific day of the week at a designated time.
When setting up a schedule, it's recommended to run scans during off-peak hours to minimize disruption. Also, ensure that your security infrastructure, such as firewalls and intrusion detection systems (IDS), is configured to allow the necessary scanning traffic.

4. Advanced settings
In this section, you can define the scope of TCP and UDP ports and choose whether to disable the automatic closure of issues related to unreachable assets or closed ports.
We recommend keeping this default option enabled, as it simplifies issue management. If an asset becomes reachable again in a future scan, any previously closed issues will automatically resurface - ensuring that no findings are lost. Additionally, using the standard set of TCP and UDP ports recommended by us helps maintain consistent results.
Click Next to continue to the asset configuration step.
5. Asset configuration
In this section, you’ll select the assets to be scanned. You can choose from your existing Autobahn asset inventory, add assets manually, or upload them using a template we provide.
If you didn’t assign tags in the previous step, you can do so here. The easiest way to apply tags - especially in bulk - is through the file upload option via the template mentioned above. You can also define asset criticality at this stage, which can later be used to build custom dashboards focused on high-priority assets.
Once the file is successfully uploaded, the assets that you added will appear in the table at the bottom. If you upload an incorrect document, click the Delete button next to the uploaded file name.
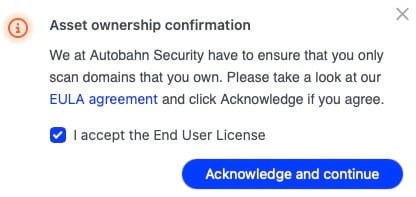
Only scan assets that belong to your organization.
To ensure this, you’ll be prompted with an Asset ownership confirmation popup before proceeding. It includes a link to the End User License Agreement (EULA), which must be accepted to move on to the final step.
6. Review and start or schedule your scan
Before initiating the scan, you have the option to review the information you've entered for the scan in the Scan summary section.
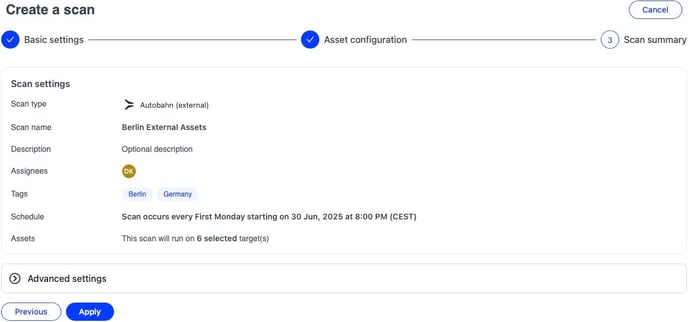
By clicking Apply, your scan will either start immediately (if you selected the No schedule - start immediately option earlier) or be scheduled according to your chosen cadence, day, and time. Scans that start right away will appear as Running in the Scanning > All scans table. Scheduled scans will be listed in the Scanning page, in the table at the top. The configuration of the scheduled scan can be edited. The scope or schedule change of the running scan can only be done once it's finished.