Follow this guide to activate single sign-on (SSO) into Autobahn using SAML and Okta
Table of content
- SAML SSO with Okta in Autobahn
- Prerequisites for SAML with Okta
- Create app integration
- Assign users
- Add Callback URL (ACS) and Issuer on Okta
- Test the login
Okta is an identity management service, built for the cloud, but compatible with many on-premises applications. Follow this guide to generate the required credentials within your Okta environment to enable Autobahn's SSO.
2. Prerequisites for SAML with Okta
SAML certificates are utilized to strengthen the security of Okta services. To configure SSO to your Autobahn platform using SAML and Okta, you need these credentials:
-
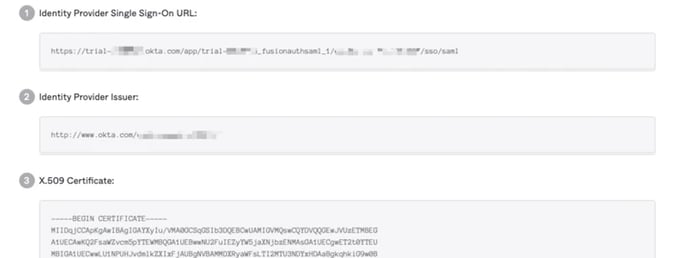
Identity Provider Single Sign-On URL generated with Okta
-
Callback URL and Recipient URL from Autobahn team to be added to Okta
3. Create app integration
1 - Log in to Okta and navigate to the Admin panel.

2 - Navigate to Applications -> Applications and click the Create App Integration button.

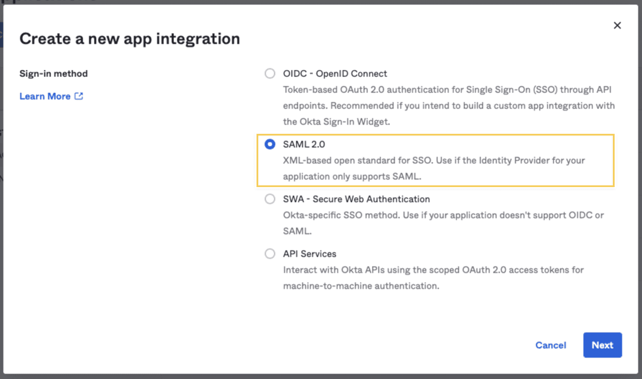
4 - Give the app a name and click Next. We recommend to name it Autobahn.

5 - Provide values for the Single sign-on URL and Audience URI (SP Entity ID). You will have to change these values later, but you need to enter something to obtain the information needed.

6 - Scroll down to Attribute Statements and add the user. Id and user.email values. You can choose any names, but record them because you will need to supply them to Autobahn later.

7 - Click Next, select one of the radio buttons on the Feedback tab, and click Finish.
8 - Scroll to the bottom of the following page and click the View SAML setup instructions button. You will need to provide the information on this page to Autobahn, so keep it open in a separate tab or window.
4. Assign users
1 - Return to the previous window and navigate to the Assignments tab.
2 - Click Assign and then Assign to People.
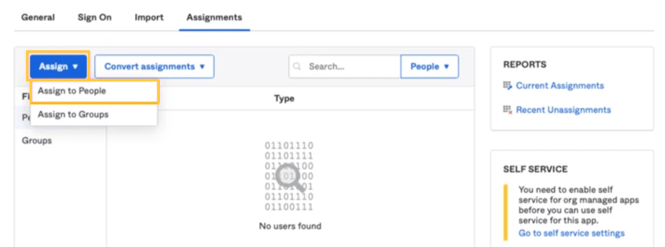
3 - Click the Assign button next to the user you want to authenticate.
4 - Click Save and you are done.
5. Add Callback URL (ACS) and Issuer to Okta
After you provide the credentials, the Autobahn team will set up the SSO for your organization in FusionAuth. They will get back to you with the Callback and Recipient URL you need to add to your previously created application.
1 - Return to your Okta dashboard. Navigate to Applications -> Your Application and edit the SAML Settings.

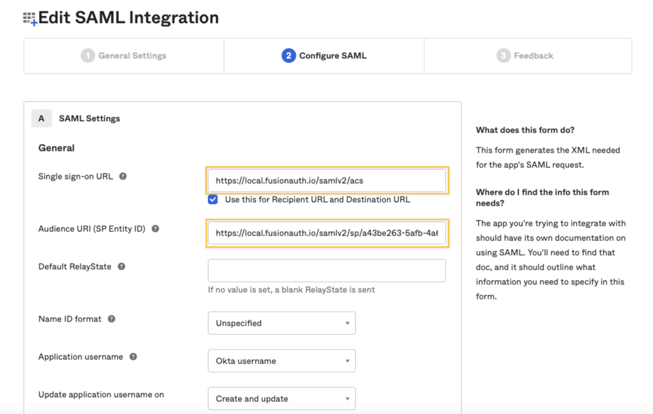
3 - Click Next and then Finish to save these settings.
6. Test the Login
Once the setup is complete, the Autobahn team will notify you. To test if the Single Sign-On (SSO) feature is active, go to the Autobahn login page and click the Log in with company account button.
1 - Click the Log in with company account button.
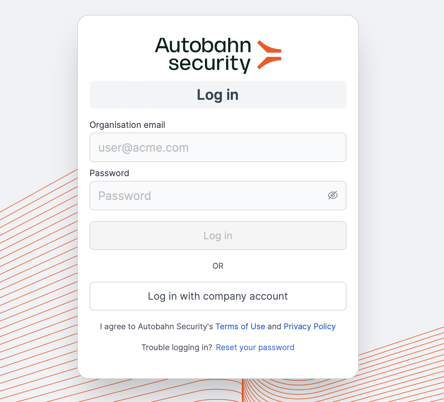
2 - Enter your company email address and click on the login button. If everything has been set up correctly, you will successfully be logged into your account.

