Follow this guide to activate single sign-on (SSO) into Autobahn using SAML and JumpCloud
Table of contents
- SAML SSO into Autobahn with JumpCloud
- Prerequisites for SAML with JumpCloud
- Create an app on JumpCloud Console
- Import metadata
- Grant access to users
- Test the login
1. SAML SSO into Autobahn with JumpCloud
JumpCloud is a cloud-based platform that allows you to manage user identities and access. This guide will help you generate the necessary credentials within your JumpCloud account to enable Autobahn's single sign-on (SSO).
2. Prerequisites for SAML with JumpCloud
To enable SAML SSO with JumpCloud in Autobahn, several steps need to be done on JumpCloud:
-
Create an app on the JumpCloud Console
-
Grant user access to the created Autobahn app
You also need to request for Service Provider Metadata file from the Autobahn Customer Success team.
3. Create an app on JumpCloud Console
You need to have an admin account on JumpCloud to create an app. After logging in to JumpCloud as administrator:
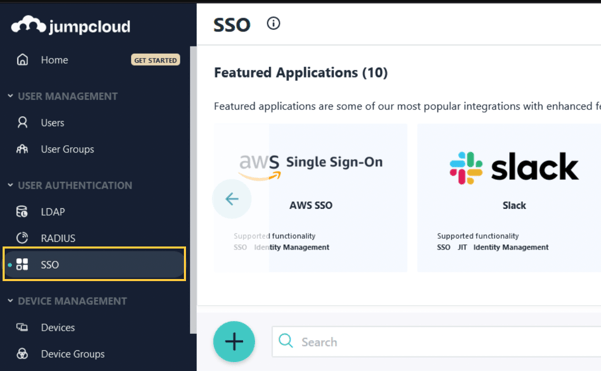
1 - Click the SSO button under the User Authentication section and proceed to add a new application.

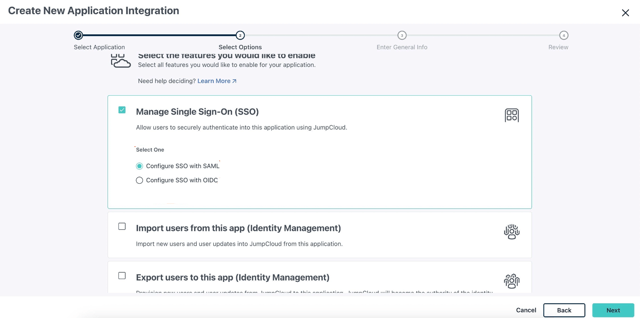
2 - On the ensuing page, select the Custom Application option.
3 - Select SAML.

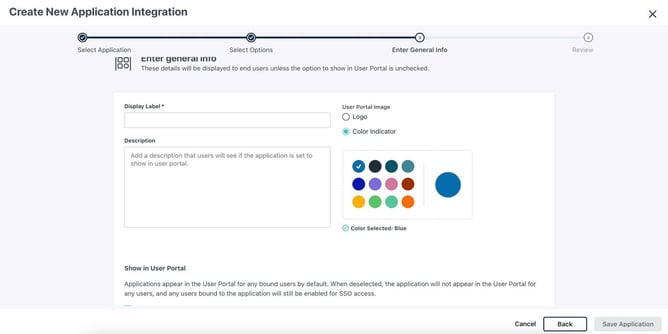
4 - Assign a suitable name (we recommend naming it Autobahn) and logo to your freshly created application, then click the Save Application button.

5 - After receiving the confirmation message, click the Configure Application button.
4. Import metadata
Extract the Metadata from this stage, as it will be required in the Key Masters section, and share it with the Autobahn Customer Success team.

5. Grant access to users
Upon creating the application, you need to assign users to access an app in JumpCloud. There are two ways to add users:
5.1 Via the User Groups configuration panel
To create a new user group that needs to have access to the application:
1 - Log in to the JumpCloud Admin Portal and navigate to User Management > User Groups.
2 - Click (+), then select Create a Group of Users.
3 - Name the new user group, then select the Users tab.
4 - Select the users you would like to add to the group.
5 - Select the Applications tab -> select the previously created application -> click Save Group.
To grant an existing group of users access to an application:
1 - Select the group of users you would like to grant access to the application.
2 - In the Groups Details panel, select the Applications tab.
3 - Select the previously created application and click Save Group.
5.2 Via the Application configuration panel
1 - Log in to the JumpCloud Admin Portal.
2 - Navigate to User Authentication > SSO Applications.
3 - Browse and select the previously created application.
4 - Select the User Groups tab.
5 - Tick the checkbox next to the group of users you want to give access to and click Save.
6. Test the login
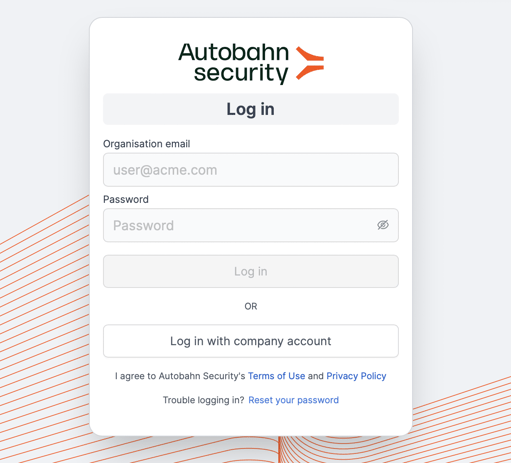
The Autobahn team will let you know once the setup is finished. To test whether the SSO is activated or not, navigate to the Autobahn login page.
1 - Click the Log in with company account button.

2 - Input your company email and click the Log in button. If it is all set up correctly, you should be successfully logged in.

